 Deutsch
 EN
EN Español
 Français
 Italiano
 Português
Looking for an easy way to keep in touch with visitors to your WordPress site? Learn how to use Sendinblue’s WordPress newsletter plugin to collect signups and start sending out email campaigns to your audience.
Whether you’re a blogger, ecommerce store, or simply have a corporate website, email marketing allows you to connect with online visitors who’ve shown an interest in your offering. But when you’re already juggling so many marketing tasks, you might be worried about adding a regular newsletter to the mix.
That’s where a WordPress newsletter plugin comes in. It’ll make the process of collecting email subscribers and managing campaigns much easier. See for yourself in this step-by-step tutorial on how to set up an email newsletter for your WordPress site using Sendinblue’s plugin.
Why You Need a WordPress Newsletter Plugin
So, you’ve got a steady flow of traffic coming to your website. But how can you get value from these visitors in the long term?
Encouraging users to sign up to get emails from you means you can keep the relationship going. For example, sending a newsletter enables you to:
- Connect with contacts directly via their inbox
- Sustain their interest with relevant content
- Bring people back to your website by sharing updates
- Get more conversions by pushing promotions
The right plugin will make it easy to set up your newsletter so you can achieve all of the above, with tools to build your subscriber list, create campaigns, and track results. Best of all, you’ll get the convenience of being able to perform actions directly in your WordPress dashboard.
Finding the best WordPress newsletter plugin for your site
When it comes to choosing a plugin for sending your WordPress newsletter, there are various options available to you. Some are linked to standalone email marketing services, while others are designed specifically for WordPress.
Criteria to consider when deciding between different options include:
- Pricing: In some cases you’ll have to pay for the plugin itself. On top of this, you might need to opt for a paid plan depending on your desired features and level of usage, such as your list size and sending volume.
- Extra functionality: Aside from enabling you to set up a basic newsletter, look into whether the solution includes other tools for creating more effective campaigns.
- Deliverability: to help keep your newsletters out of the spam folder, you’ll want a plugin that has a reliable email delivery service.
Taking into account these factors, Sendinblue offers the best WordPress newsletter plugin solution.
The plugin is free to install and once you’re set up you can use the free plan to send up to 300 emails per day to unlimited subscribers. The free version also includes handy features like ready-to-use newsletter templates and a drag and drop editor so you can easily design your emails.
Plus, you can send your newsletters with confidence thanks to Sendinblue’s strong sender reputation that will help get your emails to the inbox.
Start sending your WordPress newsletter with SendinblueSendinblue’s free plugin makes it easy to collect newsletter subscribers through your WordPress site and create campaigns that will keep them engaged. |
How to Set up Your WordPress Newsletter With Sendinblue
The steps below cover everything you’ll need to start sending newsletters using the Sendinblue WordPress plugin, including:
- Installing the plugin and connecting your site to Sendinblue
- Setting up a newsletter subscription form in WordPress
- Creating a campaign
- Monitoring performance
Once you’ve got your head around the basics, you’ll also find bonus tips on using Sendinblue’s email marketing tools to get the best results from your newsletter.
1. Install the Sendinblue WordPress plugin
Getting Sendinblue’s plugin set up on your WordPress site is quick and easy.
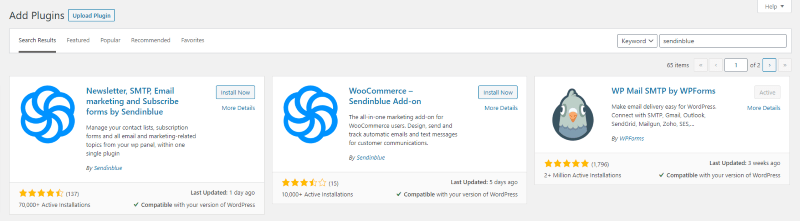
First, install the plugin by following these steps:
- Log into your WordPress dashboard as an administrator
- Go to “Plugins” in the sidebar menu, then “Add New”
- Search “Sendinblue” to find the plugin “Newsletter, SMTP, Email marketing and Subscribe forms by Sendinblue”
- Click “Install Now”, then “Activate”
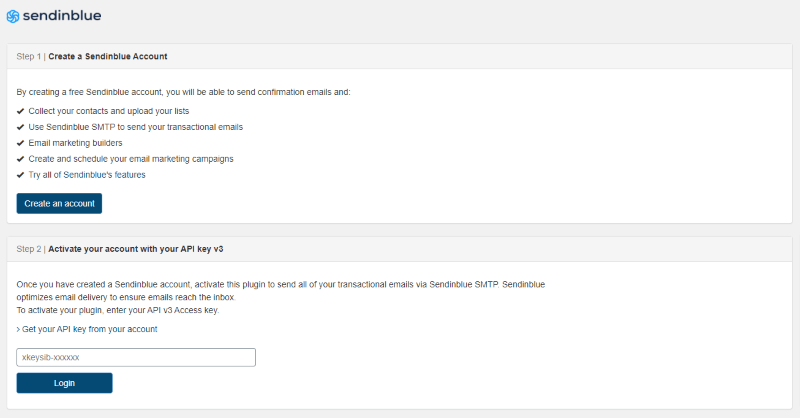
Once installed, the Sendinblue tab will appear in your WordPress sidebar menu. Click on it to continue with the plugin setup.
Next you’ll need to create a Sendinblue account if you haven’t already. To do so, click “Create an account” and you’ll be taken through the necessary steps.
When you have an account, you can connect it to the plugin using your API key. Follow these instructions to find your API key in your Sendinblue account. Then return to the plugin setup page to enter your API key and click “Login”.
2. Create your WordPress newsletter signup form
You can’t start sending out a newsletter without a list of people to contact. So, your first task is to create a WordPress email subscription form for collecting signups.
With the Sendinblue plugin you can do all this from your WordPress dashboard thanks to the easy-to-use subscription form builder.
Design your subscription form
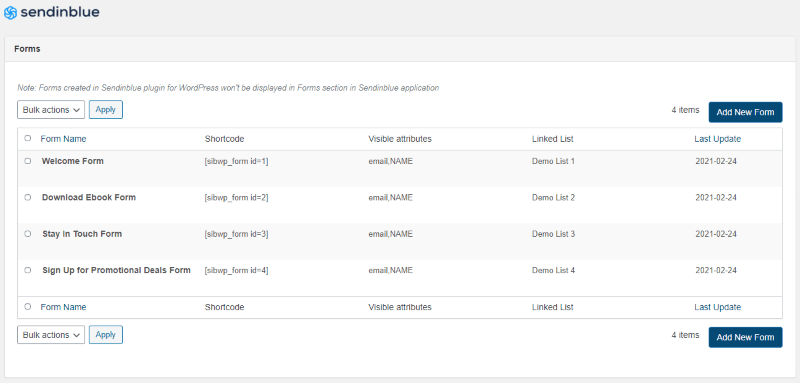
To start creating your form, go to “Forms” in the Sendinblue plugin. From there, click the “Add New Form” button.
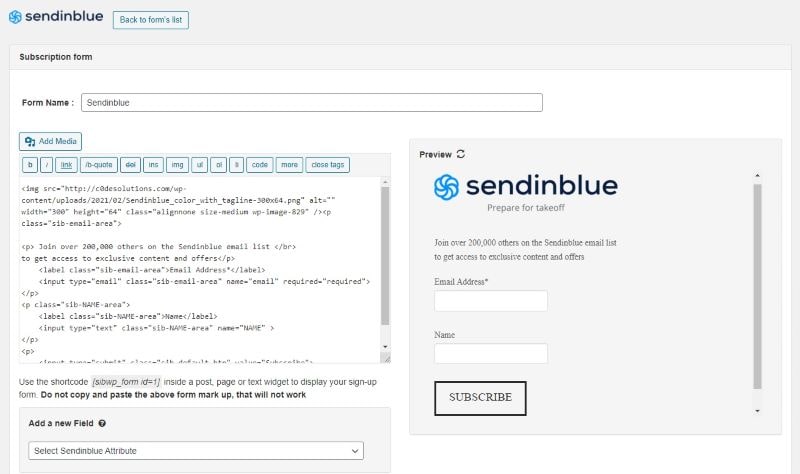
Within the tool, there are two ways to customize your form:
- A HTML editor
- A simplified interface for adding fields to your form, among other options
You can view any changes you make by refreshing the preview window.
Adding new fields to your form allows you to collect more information from subscribers. To do so, select the field you want to add from the dropdown list. The options shown depend on the contact attributes you have set up in your Sendinblue account. So you may first need to go to the Sendinblue platform to add a new contact attribute before using it as a field.
Once you’ve filled out the information for your new field, click “Add to form” and it will appear in the preview.
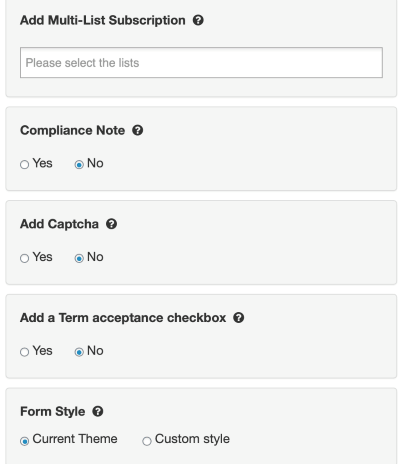
Further down you’ll find more customization options:
- Multi-list subscription for subscribers to give their preferences and be added to a corresponding list
- Captcha to protect your form from spambots
- A compliance note and checkbox to agree to terms and conditions
- Custom form style to change the default theme
Complete the form setup
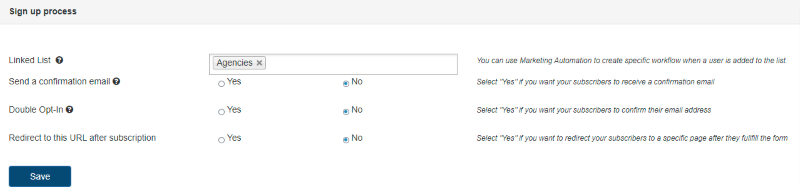
Once you’re happy with how your form looks, move to the “Sign up process” section. Here you can select which list subscribers are added to when they fill out your form.
You also have a few options to tailor subscribers’ post-signup journey:
- Sending a confirmation email to let them know they’ll start receiving your newsletter
- Setting up double opt-in so they have to click a link in your confirmation email to validate their subscription
- Redirecting them to a webpage of your choice after a successful form submission
The first two cases use Sendinblue’s automation platform to trigger emails to new subscribers. All you need to do is select the email template you want subscribers to receive. You can use the ready-made default templates or create your own in the “Templates” section of your Sendinblue account.
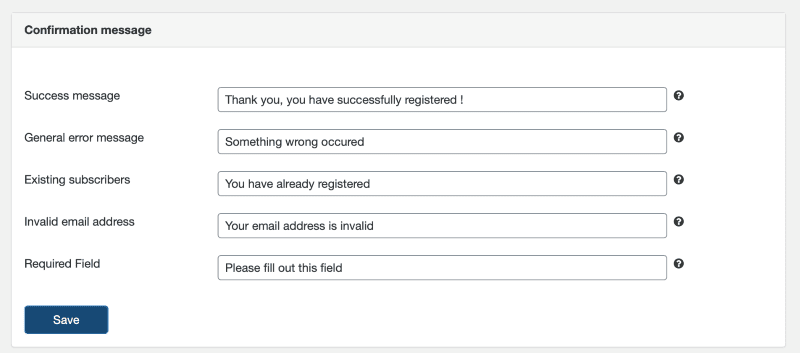
Finally, you have the “Confirmation message” settings. These let you edit the text for success and error messages that appear on your form after submissions.
Add the newsletter signup form to your WordPress site
Once your form is ready to go, it’s time to publish it on your website so the subscriptions for your WordPress newsletter can start rolling in.
With Sendinblue’s plugin, you can easily add your subscription form in different places on your website to maximize signups.
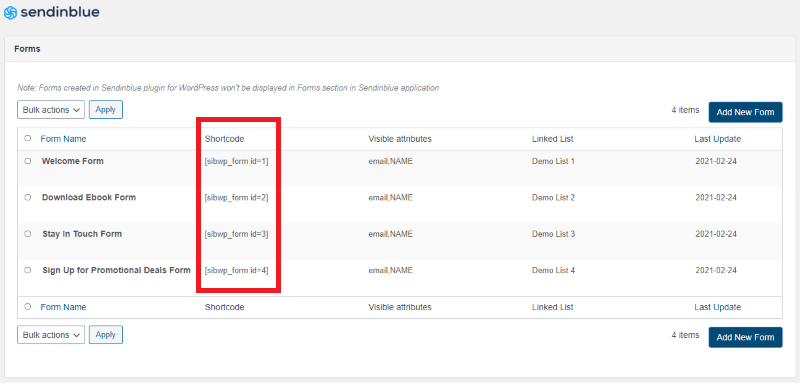
To add your form on individual pages of your site, you’ll need its shortcode. Find this in the “Forms” tab of the Sendinblue plugin. There you’ll see a list of all your created forms along with their shortcodes. Copy the relevant code then paste it into the WordPress editor for your chosen post or page.
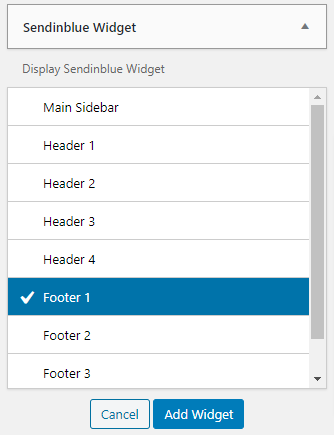
You can also add your form to your site’s sidebars or footers. To do this, go to “Appearance” then “Widgets” in the WordPress menu. There you’ll see the “Sendinblue Widget” in the list of available widgets. To activate it, either drag it to your desired sidebar/footer on the right-hand side or click on the widget to select the destination then click “Add widget”.
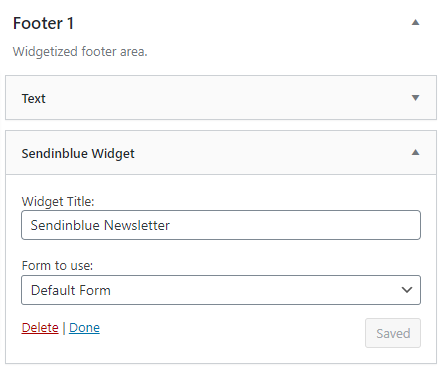
Once added, choose a title and select the form you want to appear.
3. Create your newsletter campaign
Once you’ve begun gathering subscribers for your newsletter, you’ll need to send them regular campaigns that keep them engaged.
The content of your emails will vary depending on your business. For example, an ecommerce store might send information about their latest products and promotions, while bloggers can share their new posts. Other newsletters might focus on more general company updates such as improvements to their services or upcoming events.
To get an idea of what your own newsletter might look like, check out our list of top email newsletter examples covering different sectors.
You’ll find all the tools you need to design and send your WordPress newsletter in the Sendinblue app. Read on for an outline of the process or watch this tutorial video:
Complete the email setup
To start creating your newsletter go to the “Campaigns” tab in your Sendinblue account, choose “Email” from the sidebar on the left, then click the “Create an email campaign” button.

This will take you to the setup page where you can define campaign settings including:
- Campaign name
- Subject line and preview text
- From email and name
For more detailed instructions, check out our tutorial on creating an email campaign with Sendinblue.
Design your newsletter
The next stage is to design the email itself. With Sendinblue, you have a few different options for this:
- Build your email from scratch using the drag and drop editor
- Adapt one of our free newsletter templates available in the template gallery
- Create a basic text email using the rich text editor
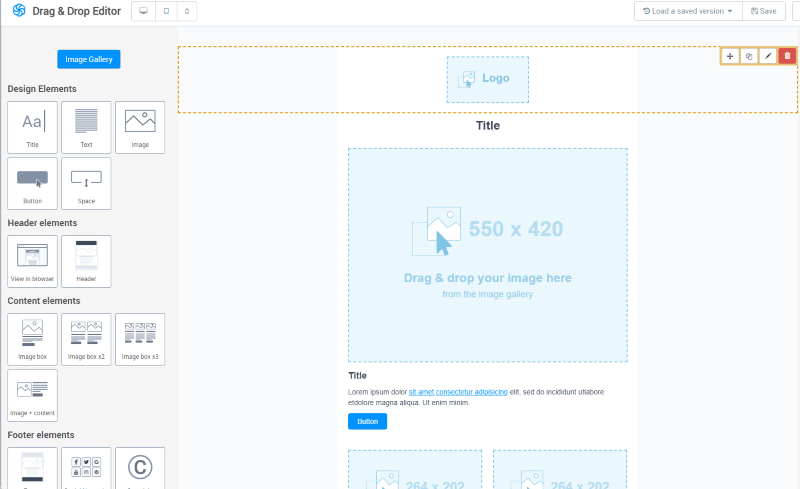
With Sendinblue’s drag and drop tool you can create responsive HTML emails without any need for coding skills. Simply use the pre-formatted blocks to build your newsletter then add in your content and customize the design. To learn more, read our detailed guide on using the Sendinblue drag and drop editor.
Send your campaign
To finish setting up your campaign, move to the “Recipients” step. This is where you select the list you want to send your newsletter to.
Finally, the “Confirmation” step shows a summary of your campaign. Once you’ve checked you’re happy with everything, you can go ahead and click the “Schedule” button in the top right corner.
Further reading: How to Create a Newsletter
4. Monitor your campaign results in WordPress
After you’ve sent your newsletter your work isn’t quite done. You should keep an eye on performance metrics to learn what works best for your audience and identify any deliverability issues.
To make things easier, you can track real-time results from your sent campaigns directly in the Sendinblue WordPress plugin via the “Statistics” tab.
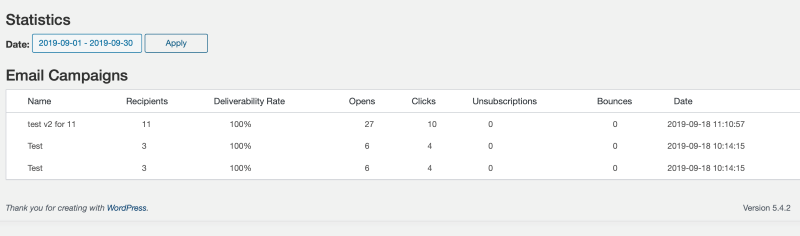
Data includes the number of:
- Opens
- Clicks
- Unsubscribes
- Bounces
Our article on email marketing KPIs has information on how to interpret these metrics, along with benchmarks to aim for based on your industry.
Up Your Newsletter Game With Sendinblue
If you’re already feeling confident about creating your WordPress newsletter, Sendinblue also has more advanced features to help take your campaigns up a notch.
Here are some ways you can use Sendinblue to maximize your results:
- Segment your audience
Rather than sending everyone the same message, with Sendinblue you can divide your email list into more targeted groups then tailor your newsletter content to their needs. To learn more check out our guide to email segmentation, which includes ideas for how you might adapt your campaigns based on subscriber characteristics.
- Add personalizations
As well as tailoring your newsletters based on traits shared by subscribers, you can also include elements that are unique to the individual. The most basic example of this is adding the subscriber’s name to your newsletter content. However, with Sendinblue you can go even further by using dynamic blocks that show different content depending on contact information.
- Run A/B tests
Sendinblue’s A/B testing feature lets you try two versions of your newsletter with your audience and then automatically sends the one that performs best to the rest of your list. This not only helps improve results for individual campaigns but also provides useful learning for your future strategy.
- Optimize the send time
When someone receives your newsletter can be just as important for engagement as its content. Sendinblue can help you get this right by automatically sending your newsletter at the best time for each contact based on machine learning.
Try Our WordPress Newsletter Plugin Today
Your website visitors have the potential to become loyal followers of your brand — if you can keep up their interest.
By setting up a newsletter for your WordPress site with Sendinblue, you can build an audience of those who want to hear more from you, then send campaigns to cultivate the relationship.
See how you can get more from your online visitors by trying Sendinblue’s WordPress newsletter plugin today. It’s free to install and you’ll be able to send up to 300 emails a day at no extra cost.


Comments
Thanks for sharing amazing post. This will help me to send emails for my blog with WordPress newsletter plugin.