Deutsch
 EN
EN Español
 Français
 Italiano
 Português
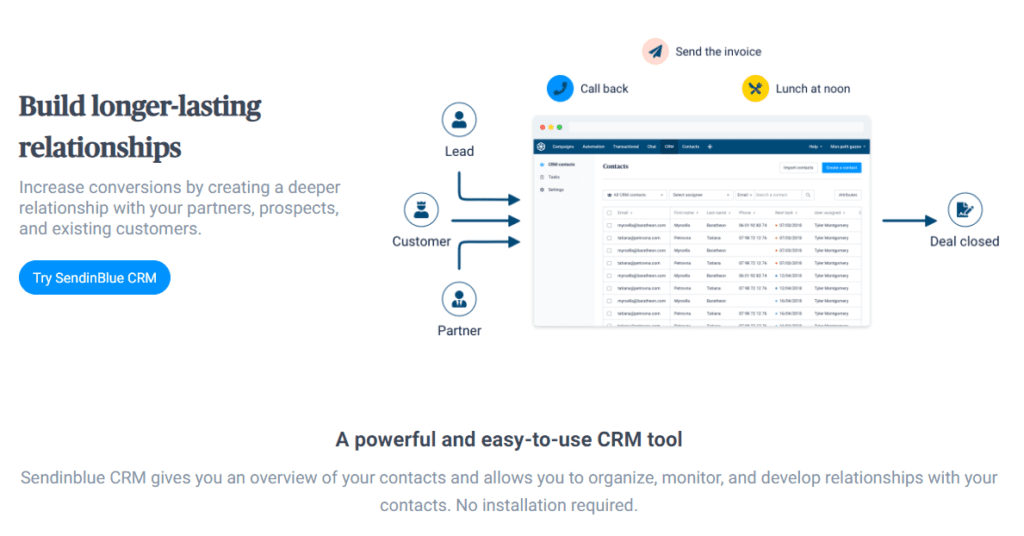
Did you know? The Sendinblue sales and marketing toolbox is now equipped with a CRM feature! Setting up CRM software for small business has never been easier. This 4-step guide will show you exactly how to do it.
CRM, or Customer Relationship Management, is the term that refers to all the processes, actions, and technologies a company uses to manage its customer relationships.
CRM solutions are seeing a rapid uptake as companies recognize the need to access customer data in real-time and personalize the customer journey. In 2019 87% of businesses are using a cloud-based CRM solution to support their CRM strategy.
Managing and monitoring your customer relationships in a dedicated CRM system has numerous advantages. These include the ability to highlight opportunities to make personalized and relevant offers – just one of the many ways in which CRM software improves customer experience.
Looking for an easy-to-use CRM that’s ideal for small businesses? There’s one waiting for you on Sendinblue’s all-in-one sales and marketing platform along with other functions such as email, SMS, and chat marketing.
I want to try Sendinblue’s CRM software for free >>
Follow these four simple steps to get your CRM for small business up and running in no time.
1. Launch CRM on the Sendinblue platform
It only takes a few clicks to launch the Sendinblue CRM as there is no need to install any software. Everything is hosted on our servers to make things easy for you.
To begin, log in to your Sendinblue account.
On the dashboard, click on the CRM tab on the top right and you’ll land on the following page:
Click on the button Try Sendinblue CRM.
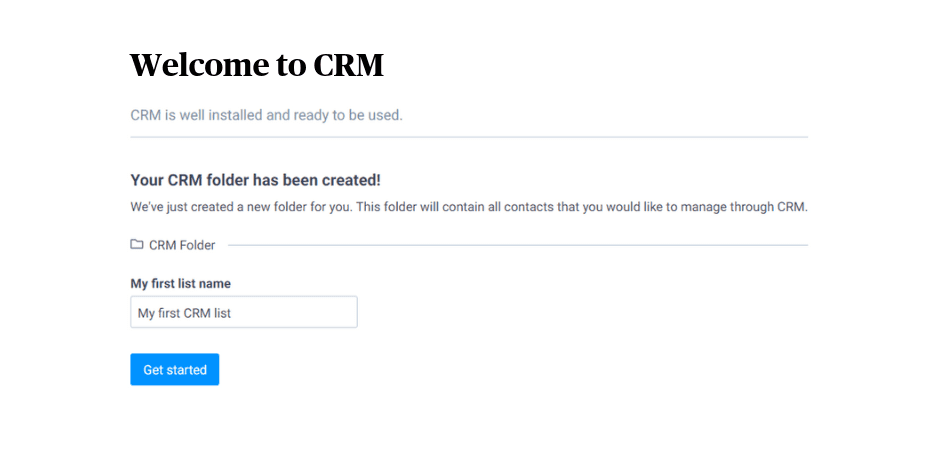
A new CRM folder will be created for you. Give your CRM list a name and your CRM for small business is ready to go.
Next, we’re going to make some adjustments so that it matches your specific needs.
2. Add your contacts
Clicking CRM contacts in the column on the left will bring you to this page:
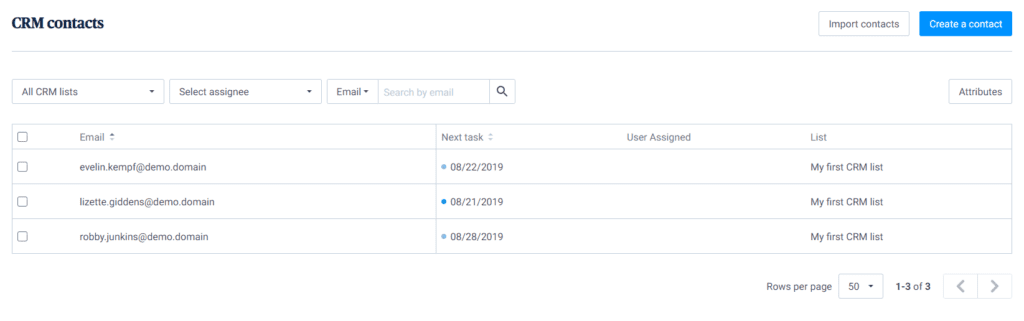
This is the list that contains all the contacts of your CRM. For demonstration purposes, it already contains some example contacts.
To start adding real contacts, you have two options: add new contacts manually or import existing contacts.
Add new contacts manually
Click Create a contact and a new window will open.
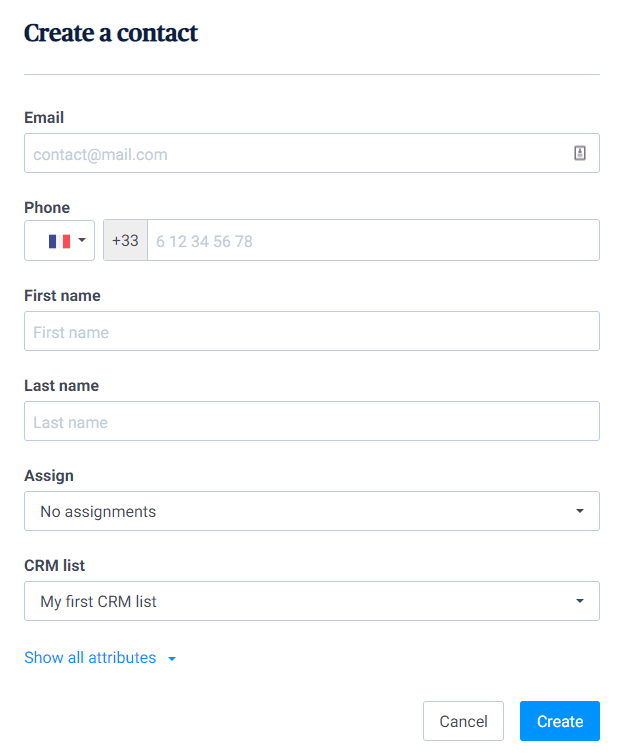
Fill out your contact’s information as requested in the above form (email address, phone number, first name, last name).
Assign the contact to one of your existing CRM users and choose the list to which you want to add it.
Then click Create.
Tip: By selecting Attributes and then clicking ‘Add new attribute’, you can personalize your contacts by adding additional characteristics to their profile such as a date of birth or a lead score.
Import new contacts
Back on the initial page showing the list of CRM contacts, select Import contacts and you’ll arrive on the following screen.

Here, you have several options:
Select existing contacts
This option allows you to select contacts from among your existing Sendinblue contacts.
To manually select contacts from your existing Sendinblue list, click on Select specific contacts.
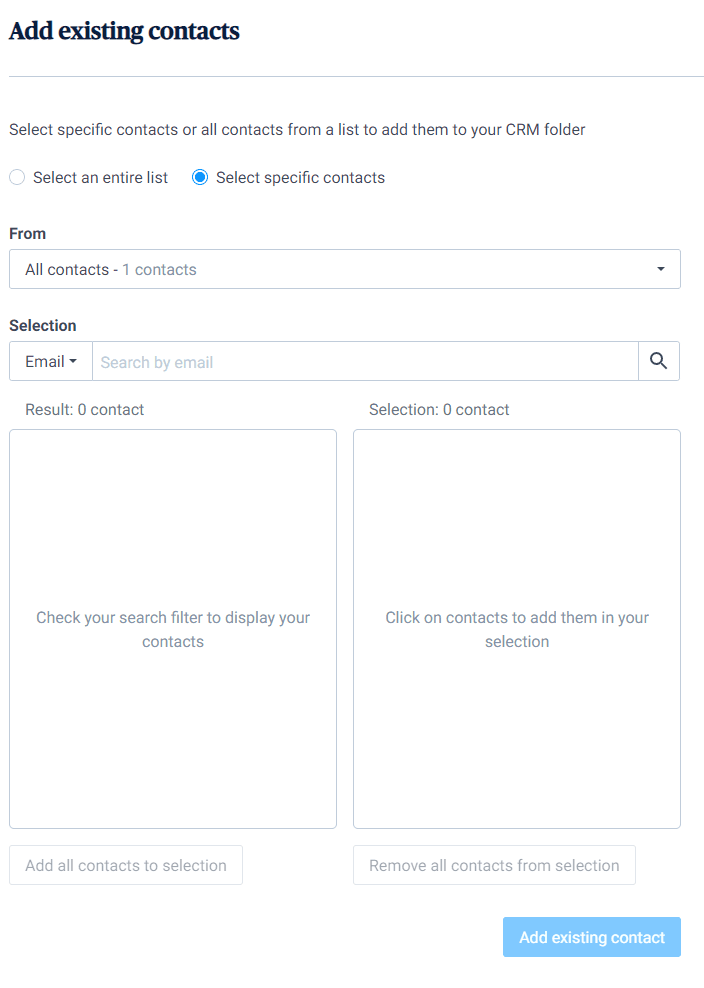
Type the name/surname or email of the desired contact and click the search icon. Once located, the contact will appear in the column on the left. To add the contact to your selection (i.e. the column on the right), simply click on it. Or click Add all contacts to the selection to add everything from the search results.
To add an entire list of contacts, click on Select an entire list.
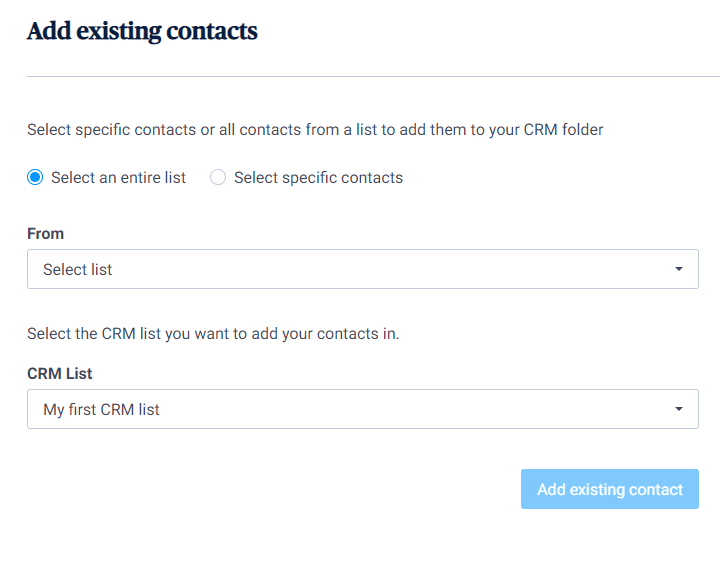
Select the target Sendinblue contact list from the first drop-down menu. Choose the CRM list to which you want to add your contact list in the second drop-down menu. Then click Add existing contacts to confirm your selection.
Upload a file
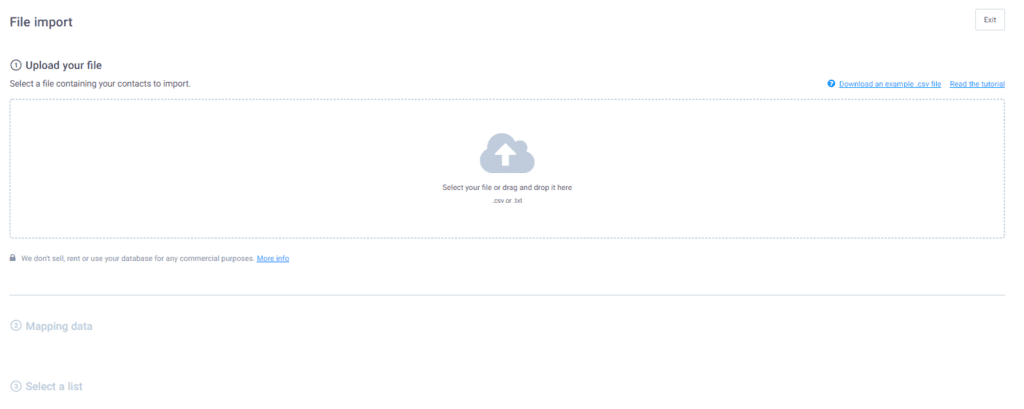
Either select the file containing your contacts directly from your drive or drag and drop it into the available space. The file must be in either .csv (Excel) or .txt format. The contacts will be added directly to your CRM contact list.
For more information on this step, click Read the tutorial on the top right.
Copy/Paste
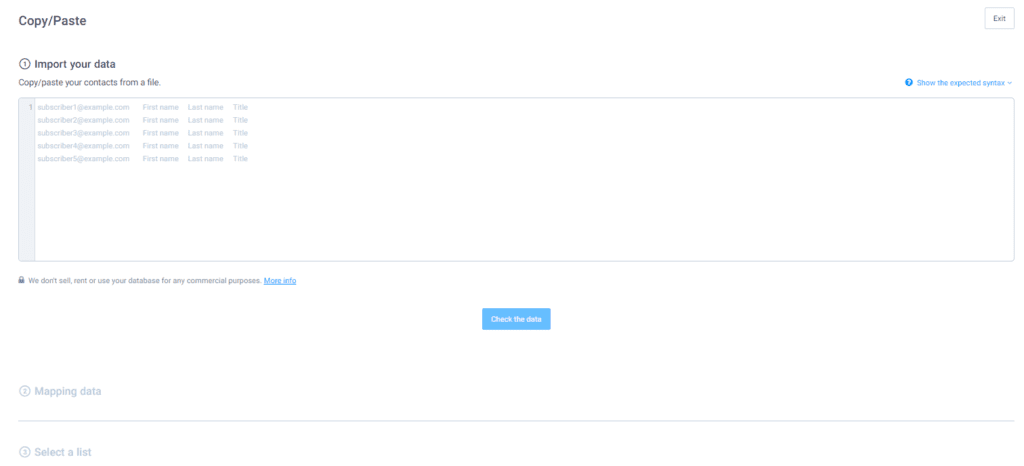
Copy the addresses directly from the file and paste them here. Stick to the format ‘email – First name – Last name – Title’.
Once entered, hit Check the data.
Now that your contacts have been added to your CRM list, it’s time to start assigning and organizing your various CRM tasks.
3. Manage your CRM tasks
Back on the homepage of the CRM tab, click on Tasks in the column on the left.
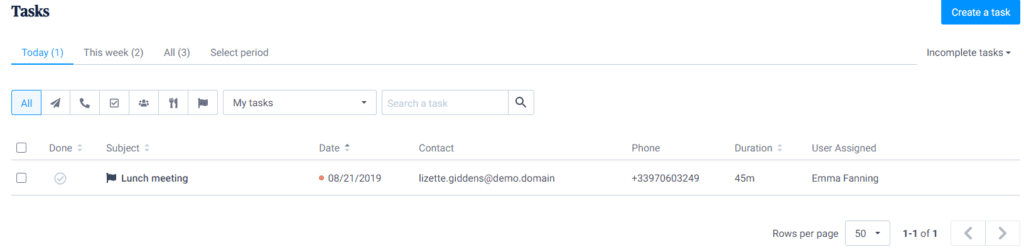
To add your first task, click on the Create a task button on the top right.
A new Create a task window will appear. These tasks represent the next steps that you want to put in place to develop the customer relationship.
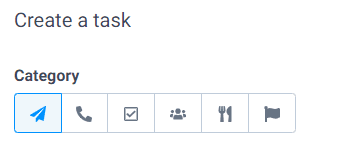
These are the different categories of tasks you can plan in the Sendinblue CRM:
- Send an email
- Phone call
- To do
- Meeting
- Lunch
- Deadline
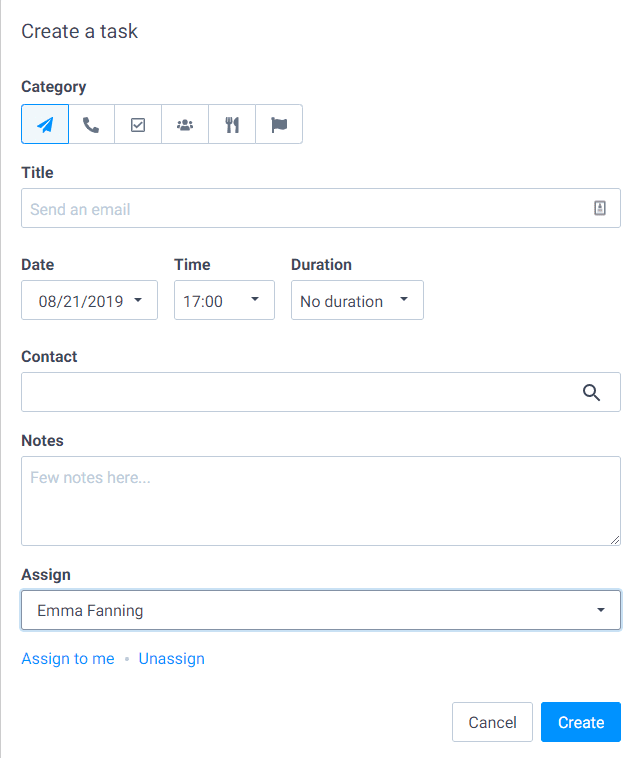
Select the category of the task and add a title.
Schedule the date and time, duration, and select the target contact.
You can also add any additional notes such as “Don’t forget the contract” or “Ask about the progress of X project”.
Assign the task to either yourself or someone in your team and then click Create.
Once the task has been created, it’ll appear in the list of your CRM tasks. To locate it quickly you can:
- Filter tasks to see only your tasks or the ones that haven’t been assigned to anybody yet (to not miss out on any lead opportunities!)
- View your tasks for a certain day, week, or other defined period
- Carry out a search among your tasks
You can always modify a task by simply clicking on it. This is useful if you need to change the date, the duration, or assign it to another colleague.
4. Set up your notifications
The final step – go to the Settings tab (in the left hand column) and click on Notifications to determine the events for which you wish to receive a notification or email.
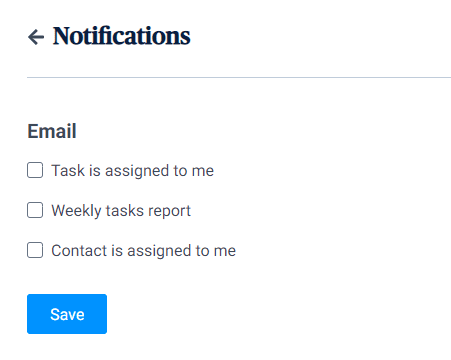
Tick the corresponding boxes to be notified when:
- A task has been assigned to you
- To receive a weekly report of your tasks
- A contract has been assigned to you
Then click Save.
Congratulations, your CRM for small business is now ready for use! From now on you can expect your customer relationship management to be more free-flowing and efficient.
Develop your overall CRM strategy
Keep in mind that to get the most out of your CRM solution, you need a well-thought-out CRM strategy. For advise on how to do that, have a read of our article 8 Steps to Creating a CRM Strategy for Your Business.
You may also be interested in these real-life CRM examples to inspire your CRM strategy.
For more content like this, subscribe to our newsletter and follow us on Twitter!